Wednesday, October 30, 2013

Pumpkin Everything - Crockpot Chili and Pumpkin Cornbread

Or maybe just Pumpkin Chili and Pumpkin Cornbread.  I love everything pumpkin so when my friends decided to have a fall party at work I jumped at the chance to make something new.  I will admit though that I cheated and used butternut squash instead of pumpkin for the chili since ShopRite sells it already cubed. 

Chili Ingredients:
2 Packages Cubed Butternut Squash (20 oz each)
1 Red Bell Pepper Chopped
1 Medium Onion Chopped
3 Cups Broth (could have used less, maybe 2 cups)
1 Cup Beer
4 Tomatoes Chopped (about 1-2 inch cubes)
1 Jalapeno Diced
2 Cans Black Beans drained
1 1/2 Tbsp Chili Powder
1 Tbsp Paprika
1 1/2 tsp cumin
1 tsp Red Pepper Flakes
1 tsp cinnamon
Salt and Black pepper to taste
 

Once everything is chopped and diced just throw it in your 6qt Crockpot and cook on low for 8 hours


Once this was finished it was a bit more watery than I would have preferred.  As I noted in the ingredients you can remove a cup of broth or even remove the beer.

Next up is the Pumpkin Cornbread!  Yup, you heard me right and it's just as awesome as it sounds!

Cornbread Ingredients:
1/2 Cups Brown Sugar
1 Cup Cornmeal (I used corn grits for more of a bite)
1 Cup Flour
1 tsp Salt
1 1/2 tsp Baking Powder
1 1/2 tsp Baking Soda
1/4 tsp Cinnamon
1/8 tsp Nutmeg
1 Tbsp Molasses
2 Whole Eggs
1 Egg White
1 Cup Pumpkin Puree
1 Stick Butter softened (minus about 1 Tbsp to grease 8"x8" baking dish)


Add all of the dry ingredients to one mixing bowl and the wet ingredients to another. 


Stir the wet mixture into the dry mixture until smooth. Do this by hand so you don't over work the batter.  Pour the batter into baking dish and bake at 350 for 40 minutes. 


This is a great fall meal!  Or if you like pumpkin (or butternut squash) this is a great all year round meal!

Thursday, October 24, 2013

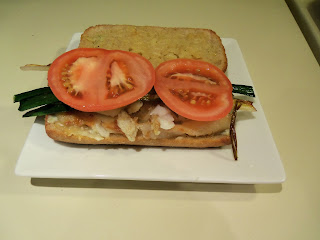
Garlicy Flounder Sandwich

 I could NOT wait to share this one with you!  It's the best sandwich I've ever had!  You MUST make this!!  Even if you're not a fish person, try this with thin strips of chicken or slices of London Broil.  This is TOO good to pass up!  Can you tell I'm excited?

I started by roasting a bulb of garlic.  I sliced the top off of a bulb, placed it over foil and drizzled olive oil over the top. 

I added the wrapped garlic to a oven safe bowl to be sure the oil didn't drip in the oven if the foil didn't hold.  I roasted it for 45 minutes at 400 degrees.  Once it's done you can just squeeze the garlic out one by one.  This can be done a few days ahead of time. 


I then made a basil Aoili with:
2-3 Cloves garlic
1/2 - 3/4 tsp Salt
About 6 leaves Basil
1/2 Tbsp Lemon Juice
1 Cup Mayonnaise


Mash the garlic and salt together with a fork or mortal and pestel.  Once you form a paste add the basil and blend well.  Add the lemon juice and mix together.


Add everything to the mayonnaise and place in the fridge until you're done with the rest of the meal.  This can be done a few days ahead of time.  


The rest of my ingredients were:
2 baby Leaks
2 Flounder Filets
1/2 cup or more of Flour
2 Whole Wheat Rolls
Butter
Tomato
Basil Salt (I follow this recipe)
2-4 Roasted Garlic Cloves


Slice the baby leaks in half and rinse under water.  Heat a mixture of butter and oil in a pan and add the leaks.    


 Once they are crispy, transfer them to a plate.  I don't have any pictures of me cooking the fish, but salt each side of the filet and lightly flour them.  Fry in the same pan you made the leaks in.


While the fish is cooking slice the rolls and spread butter and mashed roasted garlic on each side.


Bake bread for a few minutes until butter is melted and edges are browned.  


Spread Aoili on bread.  Use your judgement on how much to add!


Top with Flounder


Top with Leaks... omg this smelled so good!


Top with Tomato 
(fun fact, I sprinkled the rest of the tomato with the left over basil salt and ate it like an apple)


Top with the other half of the bread


OMG I want to eat this every night!!!


Friday, October 18, 2013

Lemony Eggplant Rollatini

I know it's been a long time since I've written anything.  After my accident I found it hard to get back into the swing of things at home.  But I'm back and I have a lot of creative dishes to share with you.  The Husband has gone back to eating some meats so I may even through in a recipe for pork chops or steak every once in a while!  My first dish I want to share with you is a yummy Rollatini dish.  It's surprisingly easy to make and delicious to eat!

 I started with:
2 Medium Eggplants
2-4 Minced Cloves Garlic
1 Diced Medium Onion
6 Skinned and Chopped Plum Tomatoes (like I did here)
1 1/2 Cups Ricotta Cheese (preferably Homemade!)
Zest from 1 Lemon
1/2 Cup Parmesan Cheese
3 Tbsp Chopped Basil

Start by carefully slicing the eggplant into 1/2 inch strips.  You can peal them before hand to help reduce some bitterness from the skins, but I didn't bother today.  Lightly coat each slice with olive oil, salt and pepper and bake at 375 for about 10-15 minutes.  Turning over half way.
Meanwhile, heat a Tablespoon of oil in a pan and add the garlic. 

Once the garlic begins to cook and become fragrant, add the onion and saute until it starts to turn translucent.
Make sure not to let the garlic burn!

Add the tomatoes
 While the tomatoes reduce you can begin making the filling for your rollatini!  Add the Ricotta and Parmesan cheeses to a bowl with 2 tablespoons basil and the lemon zest.   Mix thoroughly and add salt and pepper to taste.  You may want to add the lemon zest in small additions until you feel it has the flavor you're looking for!

 Once the eggplant is soft, you can start filling it.

Add about 2 tablespoons of the cheese mixture to each slice of eggplant.  Begin rolling from the filled side upward to create the Rollatini shape.

Place on a plate, seam down so they don't unroll.
 Once the tomatoes have softened and their juice has reduced, add the left over tablespoon of basil to the sauce. 

 Top the rollatini with sauce and some fresh Parmesan cheese and enjoy with a side salad.
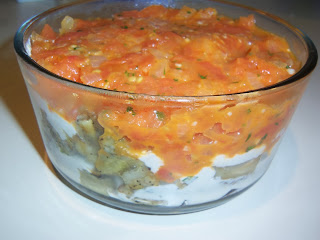
 Instead of assembling the left overs I decided to create a casserole of them.  I added a layer of cheese to the bottom of my Pyrex dish followed by a layer of diced eggplant and another layer of cheese.  I finished it off with the last of the sauce. 

It made for a great lunch the next day!